This assignment will make you familiar with Statecharts.
The grading scheme is detailed in the behavioural requirements
Upload the AToM3 model file, its bitmap representation, and the compiled
file and all the files needed to run the UI application to WebCT and provide links
to the bitmap image and to the zip file containing your executable applicatin from
your index.html file.
Also include any additional information the corrector might require to correct the
assignment.
Your submission should consist of the the html file, the image and wristwatch.zip
(containing the files to run the applciation as well as the AToM3 model).
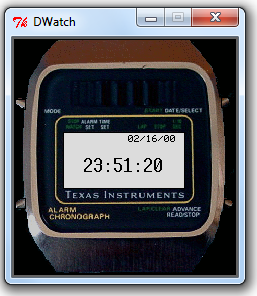
In this assignment, you will design a Statechart model specifying the reactive behaviour of a Digital Watch (inspired by the 1981 Texas Instruments LCD Alarm Chronograph).
You will first model the reactive behaviour of the watch in the DCharts formalism (a variant of Statecharts) in the tool AToM3. The Statechart simulator SVM (as a plugin of AToM3) will allow you to check, by means of simulation, whether your model behaves according to the requirements. Note that it is good practice to start modelling and simulating small parts of the desired behaviour in isolation. These can be saved and later loaded to build the full solution Statechart.
The model (saved as DigitalWatchStatechart_DCharts_MDL.py) and its visual representation must both be included in your index.html solution page. The visual representation can be obtained by "print-screening" the AToM3 model to a bitmap image file called DigitalWatchStatechart_DCharts_MDL.png.
When you are satisfied with the simulated behaviour, you are ready to build a Digital Watch software application. The application's reactive behaviour will be generated from the Statechart.
The software application (DigitalWatch.py) is composed of a static component, a controller and a dynamic component.
The static component (DigitalWatchGUI.py) implements the visual aspects of the watch such as buttons, the display and the Indiglo light and organizes them into a graphical user interface (built using Tkinter, the standard Python interface to the Tk GUI toolkit).
The dynamic component (DigitalWatchStatechart.py) will be automatically generated from your Statecharts model.
The communication between the static and the dynamic components is handled by the controller (found in DigitalWatchGUI.py). User events such as button press/release are passed from the GUI to the Statechart (as strings) by the controller. Conversely, the Statechart modifies the (visual) state of the GUI by invoking the controller's methods.
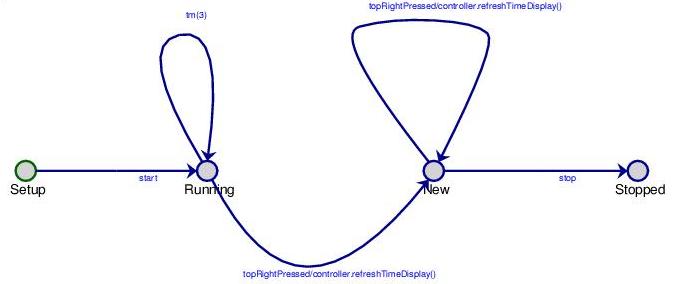
Note that the Statechart receives a reference to the controller object as a parameter of the start event when, at application startup time, it goes from its initial state Setup to the state Running.
getTime()
  Returns the current clock time.

getAlarm()
  Returns the alarm time set.

checkTime()
  Checks if the alarm time set is equal to the current
  clock time. If so, it will broadcast the "alarmStart" event
  to the statechart and return true.  Otherwise, it returns false.
  Note that checkTime() does not care/check whether the alarm
  has been set "on".
  Note: On some OS, the "alarmStart" event may not broadcast, you will need to encode this broadcast in your statechart.

refreshTimeDisplay()

  Redraw the time with the current internal time value.
  The display does not need to be cleaned before calling
  this function. For instance, if the alarm is currently
  displayed, it will be deleted before drawing the time.

refreshChronoDisplay

  See refreshTimeDisplay()

refreshDateDisplay()

  See refreshTimeDisplay()

refreshAlarmDisplay()

  See refreshTimeDisplay()

resetChrono()

  Resets the internal chrono to 00:00:00.

startSelection()

  Selects the leftmost digit group currently displayed on the screen.

increaseSelection()

  Increases the currently selected digit group's value by one.

selectNext()

  Select the next digit group, looping back to the leftmost digit group when
  the rightmost digit group is currently selected. If the time is currently
  displayed on the screen, select also the date digits. If the alarm
  is displayed on the screen, don't select the date digits. (to simplify the
  statechart).

stopSelection()

increaseTimeByOne()

  Increase the time by one second. Note how minutes, hours,
  days, month and year will be modified appropriately, if needed
  (for example, when increaseTimeByOne() is called at time
   11:59:59, the new time will be 12:00:00).

increaseChronoByOne()

  Increase the chrono by 1/100 second.

setIndiglo()

  Turn on the display background light

unsetIndiglo()

  Turn off the display background light

setAlarm()

  Flag the alarm to be on or off.


Events sent to the Statechart (as strings):

(due to button press)

- topRightPressed
- topRightReleased
- topLeftPressed
- topLeftReleased
- bottomRightPressed
- bottomRightReleased
- bottomLeftPressed
- bottomLeftReleased

(generated by checkTime() if current time == alarm time)

- alarmStart
The archive wristwatch.zip contains a very simple example to get you started. The starting point Statechart is reproduced here
The Models/DCharts/ folder in the central AToM3 installation contains some small examples demonstrating various features of Statecharts. The Models/DCharts/TrafficLight/ folder contains the small traffic light example.
It is good practice to model/simulate different parts of the overall solution in isolation (bottom-up design). You can save them in different files and later load them into a combined model.
The scc Statechart compiler tries to produce speed-optimized code. This,
at the expense of memory used. When you use too many orthogonal components this
will lead to synthesized code which cannot be compiled/run.
When you generate the code directly from AToM3,
it produces two files: the .des file and a _Compiled.py file.
The content of the latter should be put in DigitalWatchStatechart.py.
AToM3 is installed on the Trottier lab machines and can be started with
/usr/local/pkgs/atom3/atom3.sh or its alias atom3.
You will find some example models in the central Models DCharts directory (Models/DCharts/).
This is a good place to find examples of the [AFTER()], [EVENT()], etc.
macros.
The svm simulator is installed in the External/ directory of the
AToM3 central installation. It is available as a plugin from AToM3.
The scc StateChart
Compiler can be found in svm's installation directory and can be
started with /usr/local/pkgs/atom3/External/svm-0.3beta3-src/scc. The script
compile.sh calls scc with the appropriate arguments.
There is extensive documentation on SVM and SCC. This is for example where you will find detailed information on macros (including on how to write your own). For those interested in more in-depth information on SVM and SCC, have a look at Thomas Feng's M.Sc. thesis.
It is possible to install AToM3 and SVM/SCC on your own computer. They should run on (variants of) Windows, Linux, and Mac OS X (as long as Python/Tkinter is installed). Note that due to recent problems with Tkinter, there may be problems on Mac OS X. You need to download the latest version of AToM3 from http://msdl.cs.mcgill.ca/people/eugene/motif/atom3.zip. It already contains the External Utility Pack for SVM/SCC.